从 BusTub 看 Architecture of a Database System
CMU 15-445/645 课程对应的项目 BusTub 以及数据库领域的经典综述论文 Architecture of a Database System 都可以说是入门数据库的必备材料。BusTub 通过几个 Project,让我们对数据库的缓冲区管理、索引、执行引擎、事务控制等关键模块有相对深入的了解;Architecture of a Database System 则介绍了数据库系统的整体架构,让我们对数据库系统的每个关键模块都建立概念。BusTub 作为教育目的的数据库,其代码量不大,非常适合结合论文 Architecture of a Database System 阅读,了解真正的数据库系统是如何设计与组织代码的。本文以 BusTub 作为案例,结合 Architecture of a Database System 一文,看一看真实的数据库是如何组织和实现数据库系统的主要模块的。
下面,我们按 Architecture of a Database System 的章节顺序,依次进行介绍。
1. Introduction
本节是论文的引言部分,是全文的总结。这一节中比较关键的点就是了解 DBMS 的主要组件:
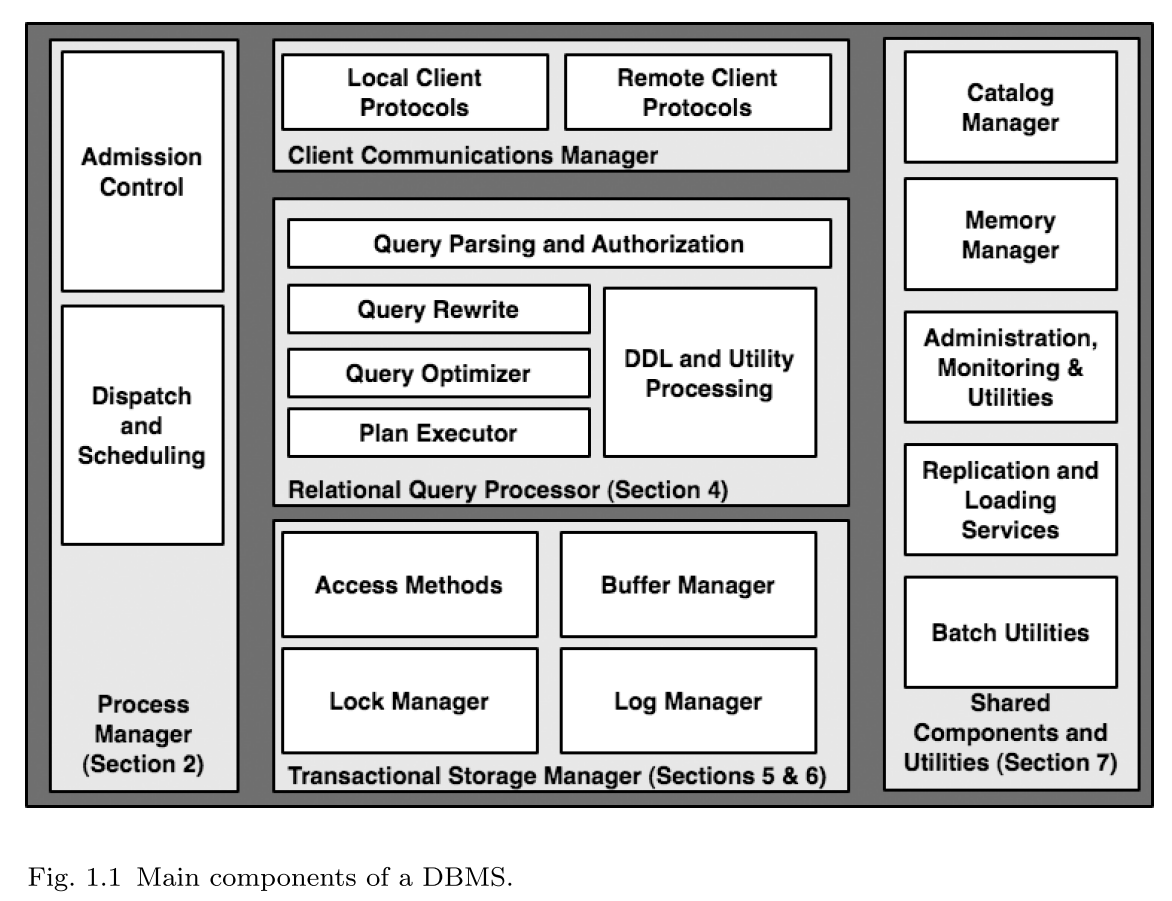
这张图片总结了主流 DBMS 中经常会出现的组件,也指导着我们进行数据库系统的设计与实现。
以 BusTub 为例,进入其 src 源码目录,使用
tree -d 命令,即可查看所有代码子目录:
1 | |
可以看到 BusTub 的代码组织非常清晰,每个目录的含义基本上一目了然:
binder:将 PostgreSQL 语法树转换为 BusTub 内部数据结构;buffer:缓冲区管理;catalog:元数据管理;common:一些工具函数,以及组装 BusTub 数据库实例;concurrency:并发控制模块;container:容器,主要是面向内存或磁盘的哈希表;execution:执行引擎,实现各种算子;include:头文件;optimizer:查询优化器模块;planner:把binder模块生成的数据结构转换为 BusTub 内部执行计划;recovery:恢复系统,主要用于实现 undo redo log;storage:存储模块,主要实现数据库页面、表、索引等数据结构;type:实现 BusTub 支持的数据类型,如int、char等,以及相关的加减法、比较等运算。
根据这些源码组织,我们可以直观的感受 DBMS 的主要组件。
2. Process Models
Process Models,或者叫处理模型,是真实 DBMS 中非常重要的部分。因为现代 CPU 是多核的,DBMS 作为重要的系统软件必须能够利用多核 CPU 的能力。
对 Linux 服务端编程稍有了解的同学都知道,服务端程序高效利用多核 CPU 无非两种模式:
- 多进程
- 多线程
具体到 DBMS 也是类似的,有以下三种细分的 process model:
Process per DBMS Worker:即多进程模型,典型 DBMS 有:PostgreSQL。示意图如下:
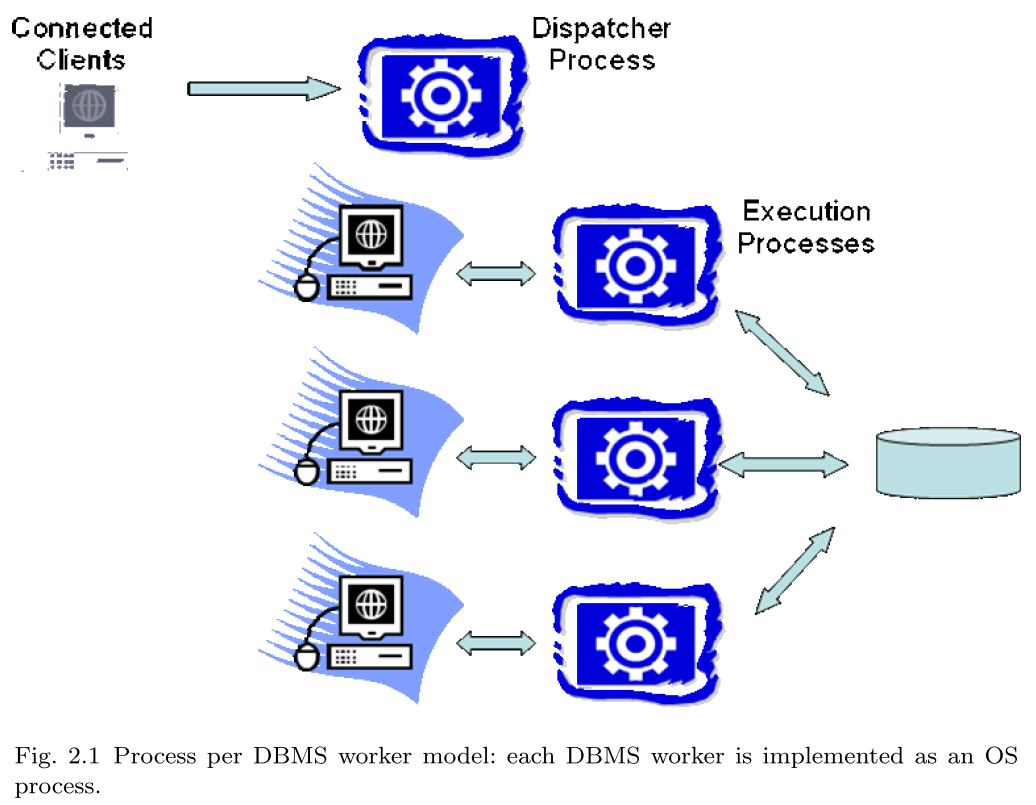
这种模型需要大量使用共享内存等进程间通信技术。由于早期 OS 对线程支持不好,得到了很多早期系统的采用。
Thread per DBMS Worker:即多线程模型,典型 DBMS 有 MySQL。示意图如下:
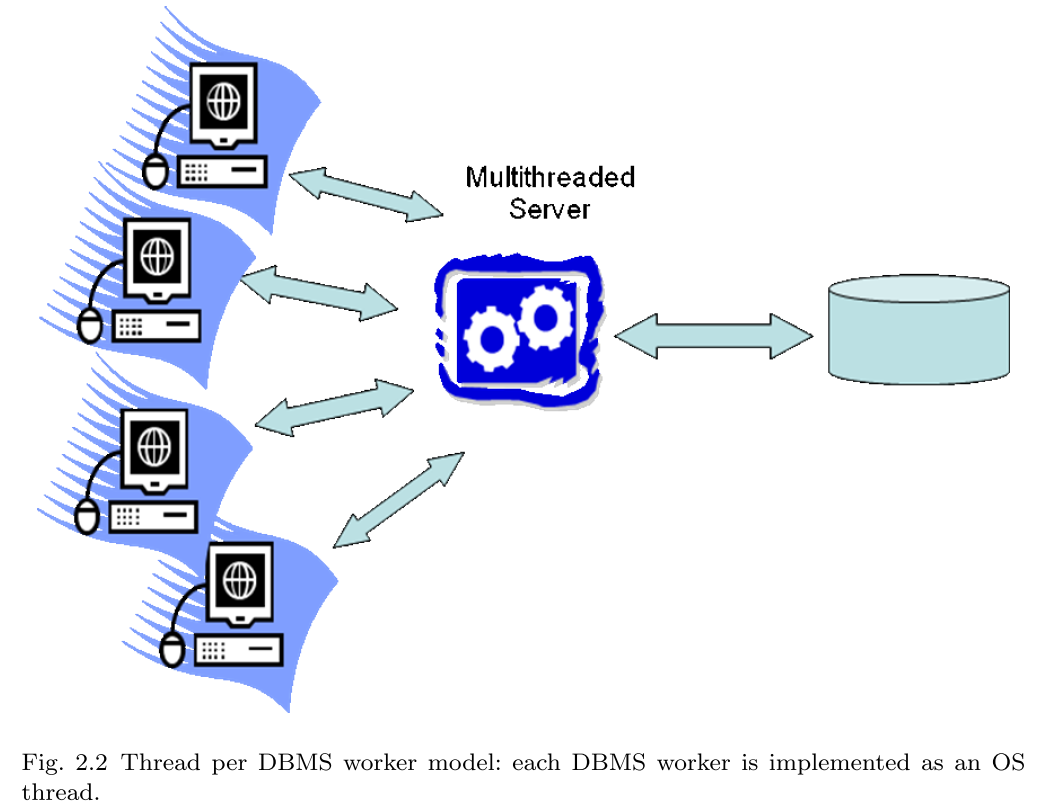
这一模型主要确定是多线程技术本身带来的数据竞争、编码和 debug 难度等。
Process Pool:即进程池,示意图如下:
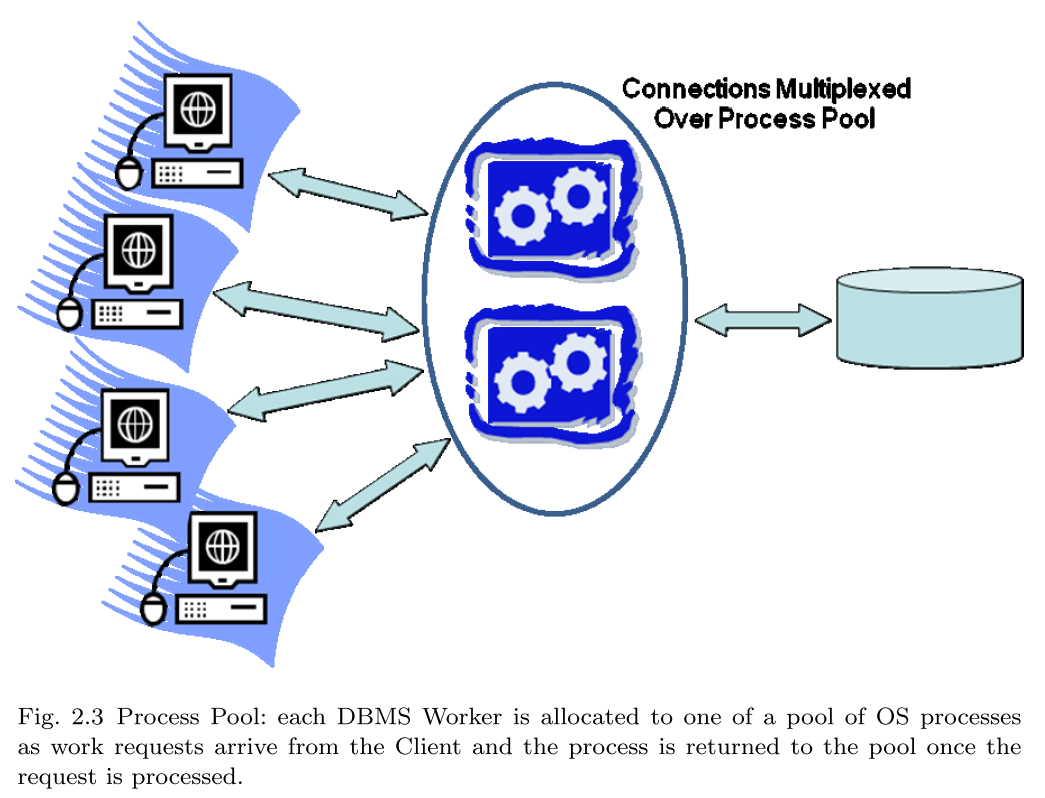
这一模型是多进程的改进。通过池化思想,防止消耗系统大量资源,同时资源预先申请并动态缩扩,提升系统整体性能。
类似进程池,自然也有线程池这一模型。尽管现代服务器程序使用线程池模型的也很多,但是原论文并未单独介绍这一模式。
BusTub 源码中似乎并不能看出其使用了哪种 process model。但是在 Project4 的并发控制项目中,性能测试使用的代码:
1 | |
可以看出,在进行性能测试时,BusTub 采用的是多线程模型。
3. Parallel Architecture: Processes and Memory Coordination
本节讨论的是 DBMS 利用现代化并行硬件的主要范式和最佳实践。
主要范式有:
- Shared Memory:可以理解为现代单机多核 CPU 服务器,即:多个 CPU 核心,甚至多个 CPU,共享内存和磁盘。
- Shared-Nothing:可以理解为分布式系统,即:每台机器都有自己的 CPU、内存和磁盘,通过网络构成分布式 DBMS。
- Shared-Disk:磁盘共享,CPU 和 内存私有,相当于多台机器共享底层的分布式文件系统,构成一个 DBMS。
- NUMA:多个内存,CPU 访问不同地址的内存延迟不同。
BusTub 在这方面无特殊设计与实现,且这个主题本身涉及的知识比较专业,本文不做讨论。
4. Relational Query Processor
本节是关系查询处理器,如原文所述:
The previous sections stressed the macro-architectural design issues in a DBMS. We now begin a sequence of sections discussing design at a somewhat finer grain, addressing each of the main DBMS components in turn.
前面的章节强调的是 DBMS 的宏观架构设计,而接下来的关注点将更加细粒度,依次研究 DBMS 的主要组件。
4.1 Query Parsing and Authorization
SQL 解析器的主要功能如下:
Given an SQL statement, the main tasks for the SQL Parser are to
check that the query is correctly specified,
resolve names and references,
convert the query into the internal format used by the optimizer, and
verify that the user is authorized to execute the query.
即:
- 验证 SQL 语句是否符合语法规范;
- 解析名字与引用,将名字转换为数据库内部的表、行数据结构;
- 将语法树转换为内部数据结构,供查询优化器使用;
- 验证用户是否有权限执行该 SQL 语句。
这一步的一般流程是:
- 从
FROM子句中解析出表名; - 调用元数据管理器
Catalog Manager判断表是否存在系统中,并使用catalog保证引用的列名都是正确的; - 验证用户是否有执行当前 SQL 语句的权限。
在 BusTub 中,不存在授权问题,不予讨论。Query Parsing 主要由两个部分完成:
BusTub 依赖的第三方库
libpg_query:来源于 DuckDB 的 SQL 语法解析模块,采用与 PostgreSQL 基本相同的语法规则。进入
third_party/libpg_query目录,使用tree -d命令查看查看代码组织结构:1
2
3
4
5
6
7
8
9
10
11
12
13
14
15
16
17$ tree -d
.
├── grammar
│ ├── keywords
│ ├── statements
│ └── types
└── include
├── access
├── catalog
├── common
├── datatype
├── mb
├── nodes
├── parser
└── utils
13 directoriesBusTub 本身的
binder模块:调用libpg_query库提供的接口,将 SQL 语句解析成语法树,并转换为 BusTub 内部的数据结构。
具体的,以 Project 4 性能测试代码执行流程来追踪这一调用流程。
tools/terrier_bench/terrier.cpp:构造数据库实例,执行 SQL:1
2
3
4
5
6
7if (enable_update) {
auto txn = bustub->txn_manager_->Begin(nullptr, bustub::IsolationLevel::REPEATABLE_READ);
std::string query = fmt::format("UPDATE nft SET terrier = {} WHERE id = {}", terrier_id, nft_id);
// std::cout << "Update:" << query << std::endl;
if (!bustub->ExecuteSqlTxn(query, writer, txn)) {
txn_success = false;
}关键是上面的
bustub->ExecuteSqlTxn(query, writer, txn)函数调用。src/common/bustub_instance.cpp:调用Binder类提供的函数,解析 SQL 为内部数据结构,并执行 SQL:1
2
3
4
5
6
7
8
9
10
11
12bool is_successful = true;
std::shared_lock<std::shared_mutex> l(catalog_lock_);
bustub::Binder binder(*catalog_);
binder.ParseAndSave(sql);
l.unlock();
for (auto *stmt : binder.statement_nodes_) {
auto statement = binder.BindStatement(stmt); // 转换为内部数据结构
// 根据 SQL 类型(Create table、index;Insert;Select 等调用对应的函数)
// 省略部分代码...
}上面的关键是
bustub::Binder binder(*catalog_)构造Binder对象,以及调用binder.ParseAndSave(sql)和auto statement = binder.BindStatement(stmt)将字符串类型的 SQL 解析为 BusTub 的内部数据结构。src/binder/binder.cpp:Binder类的代码逻辑:调用libpg_query的接口并转换为语法树:1
2
3
4
5
6
7
8
9
10
11
12
13
14
15void Binder::ParseAndSave(const std::string &query) {
parser_.Parse(query);
if (!parser_.success) {
LOG_INFO("Query failed to parse!");
throw Exception(fmt::format("Query failed to parse: {}", parser_.error_message));
return;
}
if (parser_.parse_tree == nullptr) {
LOG_INFO("parser received empty statement");
return;
}
SaveParseTree(parser_.parse_tree);
}其中的关键是
parser_.Parse(query)。parser_数据成员的定义是:duckdb::PostgresParser parser_,可以看出,是调用了 DuckDB 的内部接口。third_party/libpg_query/postgres_parser.cpp:进入第三方库。这里的主要函数是:1
2
3
4
5
6
7
8
9
10
11
12
13void PostgresParser::Parse(const string &query) {
duckdb_libpgquery::pg_parser_init();
duckdb_libpgquery::parse_result res;
pg_parser_parse(query.c_str(), &res);
success = res.success;
if (success) {
parse_tree = res.parse_tree;
} else {
error_message = string(res.error_message);
error_location = res.error_location;
}
}这是 DuckDB 执行 SQL 解析的接口,传入 SQL 并判断是否合法;若合法,保存语法树。语法分析的细节涉及到编译原理相关知识,本文不详细介绍 SQL 语法解析的流程。
src/binder/transformer.cpp:将 语法解析树转换为 BusTub 内部的Binder***Statement数据结构:1
2
3
4
5
6
7
8
9
10
11
12
13
14
15
16
17
18
19
20
21
22
23
24
25
26auto Binder::BindStatement(duckdb_libpgquery::PGNode *stmt) -> std::unique_ptr<BoundStatement> {
switch (stmt->type) {
case duckdb_libpgquery::T_PGRawStmt:
return BindStatement(reinterpret_cast<duckdb_libpgquery::PGRawStmt *>(stmt)->stmt);
case duckdb_libpgquery::T_PGCreateStmt:
return BindCreate(reinterpret_cast<duckdb_libpgquery::PGCreateStmt *>(stmt));
case duckdb_libpgquery::T_PGInsertStmt:
return BindInsert(reinterpret_cast<duckdb_libpgquery::PGInsertStmt *>(stmt));
case duckdb_libpgquery::T_PGSelectStmt:
return BindSelect(reinterpret_cast<duckdb_libpgquery::PGSelectStmt *>(stmt));
case duckdb_libpgquery::T_PGExplainStmt:
return BindExplain(reinterpret_cast<duckdb_libpgquery::PGExplainStmt *>(stmt));
case duckdb_libpgquery::T_PGDeleteStmt:
return BindDelete(reinterpret_cast<duckdb_libpgquery::PGDeleteStmt *>(stmt));
case duckdb_libpgquery::T_PGUpdateStmt:
return BindUpdate(reinterpret_cast<duckdb_libpgquery::PGUpdateStmt *>(stmt));
case duckdb_libpgquery::T_PGIndexStmt:
return BindIndex(reinterpret_cast<duckdb_libpgquery::PGIndexStmt *>(stmt));
case duckdb_libpgquery::T_PGVariableSetStmt:
return BindVariableSet(reinterpret_cast<duckdb_libpgquery::PGVariableSetStmt *>(stmt));
case duckdb_libpgquery::T_PGVariableShowStmt:
return BindVariableShow(reinterpret_cast<duckdb_libpgquery::PGVariableShowStmt *>(stmt));
default:
throw NotImplementedException(NodeTagToString(stmt->type));
}
}这里的逻辑就是根据语法树的类型(Create Table、Index、Select 等),构造对应的 BusTub 内部数据结构。
后续,就进入了具体的不同语法树生成不同内部数据结构的过程,本文不再详细介绍。
经过上述 binder 模块,BusTub 能够执行涉及元数据的一些
SQL 语句,如:新建表、新建索引、EXPLAIN 命令等,但是还不能执行 SELECT
等类型的 SQL 语句。在 BusTub 中,还需要 planner
模块的继续工作。相关代码如下:
src/common/bustub_instance.cpp:根据binder模块返回的数据结构继续调用planner模块:1
2
3
4
5
6
7
8
9
10
11
12
13
14// Plan the query.
bustub::Planner planner(*catalog_);
planner.PlanQuery(*statement);
// Optimize the query.
bustub::Optimizer optimizer(*catalog_, IsForceStarterRule());
auto optimized_plan = optimizer.Optimize(planner.plan_);
l.unlock();
// Execute the query.
auto exec_ctx = MakeExecutorContext(txn);
std::vector<Tuple> result_set{};
is_successful &= execution_engine_->Execute(optimized_plan, &result_set, txn, exec_ctx.get());src/planner/planner.cpp:调用Planner::PlanQuery方法:1
2
3
4
5
6
7
8
9
10
11
12
13
14
15
16
17
18
19
20
21
22void Planner::PlanQuery(const BoundStatement &statement) {
switch (statement.type_) {
case StatementType::SELECT_STATEMENT: {
plan_ = PlanSelect(dynamic_cast<const SelectStatement &>(statement));
return;
}
case StatementType::INSERT_STATEMENT: {
plan_ = PlanInsert(dynamic_cast<const InsertStatement &>(statement));
return;
}
case StatementType::DELETE_STATEMENT: {
plan_ = PlanDelete(dynamic_cast<const DeleteStatement &>(statement));
return;
}
case StatementType::UPDATE_STATEMENT: {
plan_ = PlanUpdate(dynamic_cast<const UpdateStatement &>(statement));
return;
}
default:
throw Exception(fmt::format("the statement {} is not supported in planner yet", statement.type_));
}
}上述代码中,根据 SQL 语句的不同类型,构造不同的执行 Plan,如:
PlanSelect、PlanInsert等。src/planner/plan_insert.cpp:以比较简单的InsertPlan为例,查看其构造流程:1
2
3
4
5
6
7
8
9
10
11
12
13
14auto Planner::PlanInsert(const InsertStatement &statement) -> AbstractPlanNodeRef {
auto select = PlanSelect(*statement.select_);
const auto &table_schema = statement.table_->schema_.GetColumns();
const auto &child_schema = select->OutputSchema().GetColumns();
if (!std::equal(table_schema.cbegin(), table_schema.cend(), child_schema.cbegin(), child_schema.cend(),
[](auto &&col1, auto &&col2) { return col1.GetType() == col2.GetType(); })) {
throw bustub::Exception("table schema mismatch");
}
auto insert_schema = std::make_shared<Schema>(std::vector{Column("__bustub_internal.insert_rows", TypeId::INTEGER)});
return std::make_shared<InsertPlanNode>(std::move(insert_schema), std::move(select), statement.table_->oid_);
}
至此,BusTub 中 SQL 解析相关模块主要代码介绍完毕。
4.2 Query Rewrite
查询重写的原文定义如下:
The query rewrite module, or rewriter, is responsible for simplifying and normalizing the query without changing its semantics. It can rely only on the query and on metadata in the catalog, and cannot access data in the tables.
可见,查询重写主要做两件事:
- 简化查询
- 规范化查询
当前,前提是不改变查询语义,且仅依赖于 catalog 中的元数据。
在很多 DBMS 中,查询重写并没有作为单独的模块实现,而是在语法解析或者查询优化中作为一个步骤实现。BusTub 也是类似的思路,其源码中并没有单独实现查询重写。
查询重写主要负责以下任务:
- 视图展开
- 常量数学表达式计算
- 谓词的逻辑重写
- 语义优化
- 子查询展开和其他启发式重写
这些任务很大部分与查询优化重叠,这里不详细介绍。感兴趣可阅读原论文或者查询优化相关论文。
4.3 Query Optimizer
查询优化器可以说是 DBMS 中最关键的组件之一,也是公认的 DBMS 中最困难、最有挑战性的部分。
原论文中,本小节主要总结了目前的查询优化相关工作对 System R 的经典论文做了哪些方面的改进,而不涉及具体的优化算法,因此本文也不详细介绍。
BusTub 中有单独的优化器模块进行查询优化,实现了一些基于规则的查询优化策略:
1 | |
4.4 Query Executor
执行引擎在上述 SQL 解析、查询计划生成、查询优化的基础上,根据优化后的查询计划,执行真正的查询。
大多数执行引擎采用火山模型,或者称之为:迭代器模型。每个执行算子拥有类似的接口,以 BusTub 为例,其虚基类定义如下:
1 | |
其中,与迭代器模型最相关的就是:Init 方法和
Next 方法。
在 CMU 15-445/645 课程的 Project 3 中,通过实现基本执行算子,我们对迭代器模型会有比较深入的了解。在 BusTub 执行 SQL 语句的过程中,还有一些点需要关注:
src/common/bustub_instance.cpp:执行 SQL 语句1
2
3
4// Execute the query.
auto exec_ctx = MakeExecutorContext(txn);
std::vector<Tuple> result_set{};
is_successful &= execution_engine_->Execute(optimized_plan, &result_set, txn, exec_ctx.get());其中,
ececution_engine_是ExecutionEngine类型的对象,其中封装了迭代器模型实现的算子,作为执行引擎。src/include/execution/execution_engine.h:1
2
3
4
5
6
7
8
9
10
11
12
13
14
15
16
17
18
19
20
21
22
23
24
25
26
27
28
29
30
31
32
33
34/**
* Execute a query plan.
* @param plan The query plan to execute
* @param result_set The set of tuples produced by executing the plan
* @param txn The transaction context in which the query executes
* @param exec_ctx The executor context in which the query executes
* @return `true` if execution of the query plan succeeds, `false` otherwise
*/
// NOLINTNEXTLINE
auto Execute(const AbstractPlanNodeRef &plan, std::vector<Tuple> *result_set, Transaction *txn,
ExecutorContext *exec_ctx) -> bool {
BUSTUB_ASSERT((txn == exec_ctx->GetTransaction()), "Broken Invariant");
// Construct the executor for the abstract plan node
auto executor = ExecutorFactory::CreateExecutor(exec_ctx, plan);
// Initialize the executor
auto executor_succeeded = true;
try {
executor->Init();
PollExecutor(executor.get(), plan, result_set);
} catch (const ExecutionException &ex) {
#ifndef NDEBUG
LOG_ERROR("Error Encountered in Executor Execution: %s", ex.what());
#endif
executor_succeeded = false;
if (result_set != nullptr) {
result_set->clear();
}
}
return executor_succeeded;
}根据执行计划,真正进行 SQL 语句执行的接口。其函数体内部首先根据执行计划,调用工厂函数
ExecutorFactory::CreateExecutor(exec_ctx, plan)构造执行算子。src/execution/executor_factory.cpp:1
2
3
4
5
6
7
8
9
10
11
12
13
14
15
16
17
18
19
20
21
22
23
24
25
26
27
28
29
30
31
32
33
34
35
36
37
38
39
40auto ExecutorFactory::CreateExecutor(ExecutorContext *exec_ctx, const AbstractPlanNodeRef &plan)
-> std::unique_ptr<AbstractExecutor> {
switch (plan->GetType()) {
// Create a new sequential scan executor
case PlanType::SeqScan: {
return std::make_unique<SeqScanExecutor>(exec_ctx, dynamic_cast<const SeqScanPlanNode *>(plan.get()));
}
// Create a new index scan executor
case PlanType::IndexScan: {
return std::make_unique<IndexScanExecutor>(exec_ctx, dynamic_cast<const IndexScanPlanNode *>(plan.get()));
}
// Create a new insert executor
case PlanType::Insert: {
auto insert_plan = dynamic_cast<const InsertPlanNode *>(plan.get());
auto child_executor = ExecutorFactory::CreateExecutor(exec_ctx, insert_plan->GetChildPlan());
return std::make_unique<InsertExecutor>(exec_ctx, insert_plan, std::move(child_executor));
}
// Create a new update executor
case PlanType::Update: {
auto update_plan = dynamic_cast<const UpdatePlanNode *>(plan.get());
auto child_executor = ExecutorFactory::CreateExecutor(exec_ctx, update_plan->GetChildPlan());
return std::make_unique<UpdateExecutor>(exec_ctx, update_plan, std::move(child_executor));
}
// Create a new delete executor
case PlanType::Delete: {
auto delete_plan = dynamic_cast<const DeletePlanNode *>(plan.get());
auto child_executor = ExecutorFactory::CreateExecutor(exec_ctx, delete_plan->GetChildPlan());
return std::make_unique<DeleteExecutor>(exec_ctx, delete_plan, std::move(child_executor));
}
// 省略部分代码...
default:
UNREACHABLE("Unsupported plan type.");
}
}工厂函数。根据执行计划的类型,递归构造不同的执行算子。
src/include/execution/execution_engine.h:构造生成执行算子后,进行poll操作,拉取结果元组:1
2
3
4
5
6
7
8
9
10
11
12
13
14
15
16/**
* Poll the executor until exhausted, or exception escapes.
* @param executor The root executor
* @param plan The plan to execute
* @param result_set The tuple result set
*/
static void PollExecutor(AbstractExecutor *executor, const AbstractPlanNodeRef &plan,
std::vector<Tuple> *result_set) {
RID rid{};
Tuple tuple{};
while (executor->Next(&tuple, &rid)) {
if (result_set != nullptr) {
result_set->push_back(tuple);
}
}
}
5. Storage Management
DBMS 管理磁盘空间有两种基本方式:
- DBMS 直接与磁盘的低级块模式设备驱动程序交互(通常称为原始模式访问):早期系统采用的方式,现在很少使用。
- 使用操作系统标准文件操作接口:DBMS 创建一个文件,使用
offset定位数据。文件被视为驻留在磁盘上的页面的线性数组。
BusTub 中,磁盘管理采用了后一种方式。其提供的主要接口就是读写页面,代码如下:
1 | |
由于磁盘相比内存有限的读写速度,buffer pool 提供了内存缓冲,作为 DBMS 与磁盘交互的中间人。缓冲池被组织成一个 帧数组,其中每个帧是一个数据库磁盘块大小的内存区域。缓冲池的一个重要数据结构是哈希表,用于将 page_id 映射到 frame_id。buffer pool manager 是 Project 1 的内容,相关代码目录如下:
1 | |
可见,BusTub 中将其分为三个部分来实现:
- 可扩展哈希表:用于将 page_id 映射到 frame_id。
- 页面替换策略:源码中包括LRU、 LRU-K、CLOCK 等页面替换算法。
- buffer pool manager:组装哈希表、替换策略等数据结构,构成缓冲区管理器。
由于这一部分是 Project 1 内容,具体代码这里不介绍。
6. Transactions: Concurrency Control and Recovery
设计良好的数据库系统能够划分为不同的组件,由不同团队分别进行开发维护,并以文档化的接口交流。但是,数据库管理系统中的事务存储管理器往往作为一个较难划分的整体,它通常包含四个相互交织的组件:
- 用于并发控制的锁管理器
- 用于恢复的日志管理器
- 用于暂存数据库 I/O 的缓冲池
- 在磁盘上组织数据的访问方法
这些组件对事务的 ACID 特性提供了不同保证:
Roughly speaking, modern DBMSs implement isolation via a locking protocol. Durability is typically implemented via logging and recovery. Isolation and Atomicity are guaranteed by a combination of locking (to prevent visibility of transient database states), and logging (to ensure correctness of data that is visible). Consistency is managed by runtime checks in the query executor: if a transaction’s actions will violate a SQL integrity constraint, the transaction is aborted and an error code returned.
BusTub 在不同年份设计了不同的并发控制相关实验,其相关代码目录结构如下:
1 | |
在 Fall 2022 Project 4 中,需要实现 2PL 算法,以及在物理算子中调用相关接口,实现不同的隔离级别。由于没有将并发控制与恢复系统结合起来,很难通过 BusTub 学习到实现完整的事务支持对数据库系统不同组件会带来什么影响。
当然,这一主题本身很复杂,后续深入学习后,有机会再做分享。
7. Shared Components
7.1 Catalog Manager
Catalog Manager 作用如下:
The database catalog holds information about data in the system and is a form of metadata. The catalog records the names of basic entities in the system (users, schemas, tables, columns, indexes, etc.) and their relationships, and is itself stored as a set of tables in the database.
BusTub 中,Catalog Manager 相关代码目录组织如下:
1 | |
在 src/include/catalog/catalog.h
中,相关数据结构和接口如下:
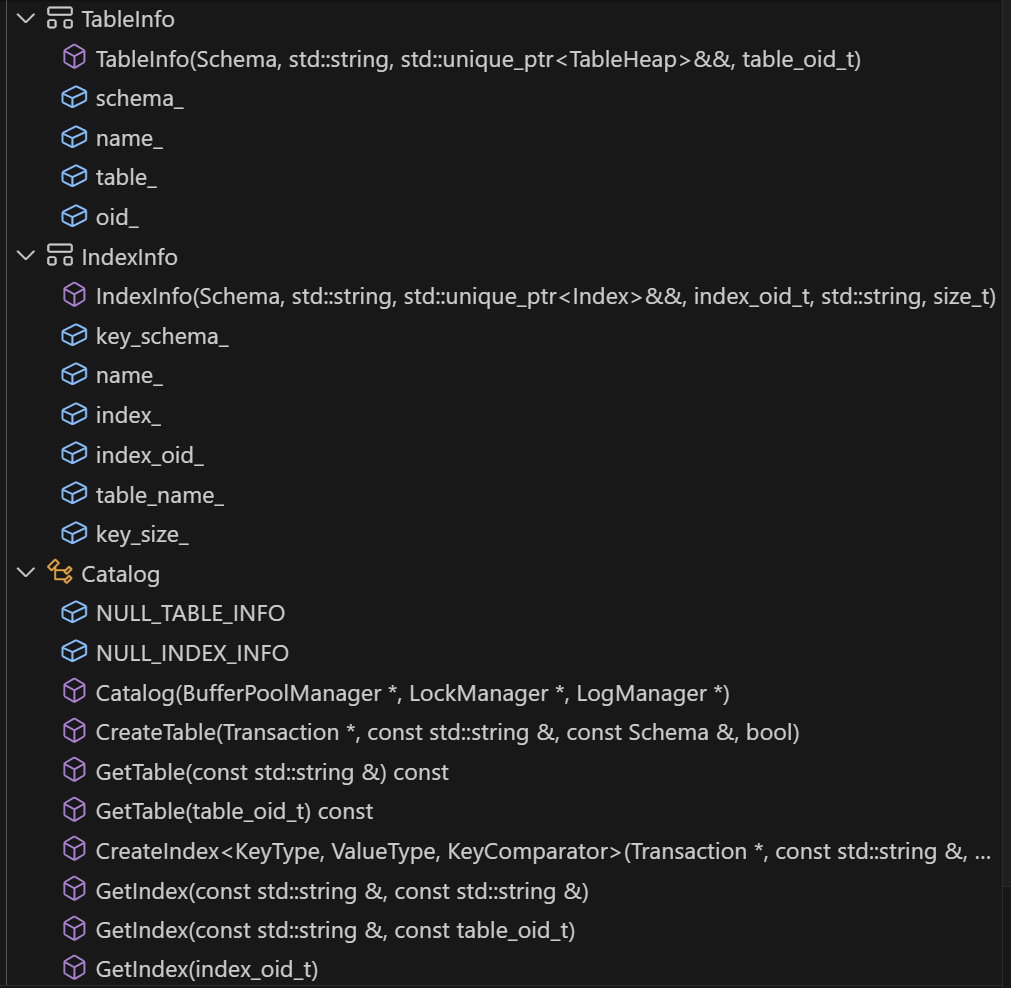
这也是我们进行 Project 3 时必须阅读的代码之一。
其它共享组件还有内存分配器、磁盘管理子系统等,这里不再介绍。
8. Conclusion
最后,贴上原论文的 Conclusion 部分,同时也作为本文的总结。
As should be clear from this paper, modern commercial database systems are grounded both in academic research and in the experiences of developing industrial-strength products for high-end customers. The task of writing and maintaining a high-performance, fully functional relational DBMS from scratch is an enormous investment in time and energy. Many of the lessons of relational DBMSs, however, translate over to new domains. Web services, network-attached storage, text and e-mail repositories, notification services, and network monitors can all benefit from DBMS research and experience. Data-intensive services are at the core of computing today, and knowledge of database system design is a skill that is broadly applicable, both inside and outside the halls of the main database shops. These new directions raise a number of research problems in database management as well, and point the way to new interactions between the database community and other areas of computing.